
Pyxis Pro User Guide
Welcome to the Pyxis Pro learning management system (LMS).
NOTE: This guide can also serve as a Quick Start guide as it is ordered in the recommended way to set up a new account. It is highly recommended that you set up your account in this order to save time and improve efficiency.
Account Settings
Once you have selected the appropriate plan for your business and have entered your payment information, you will want to set up the basic account settings needed to run your practice training and education via the LMS.
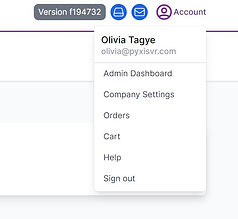
In the top right corner of the Pyxis home screen, click Account -> Company Settings
This is where you will establish your own branding and style as well as set the tone for all employees who use the platform.
-
Logo/Colors - Depending on the package you’ve selected, Pyxis Pro can adopt the color and logo of your company.
-
Welcome text - These are the first words an employee will read when beginning their training journey.
NOTE: This is also a great place to add announcements.
Create Locations
To begin, click Locations in the top navigation bar and then New Location. Add the name and address and then click Create Location. Repeat this for all locations.
We recommend establishing the locations of your business early on so that they can be referenced later. Keep in mind that locations can be used to segment employees in a number of ways. Here are a few examples:
-
A practice that has 3 locations will enter in all three locations so that employees can be sorted by each location. This reduces the number of employees that you’ll have to sift through when setting up a new training at a particular location.
-
Locations can also be used to segment employees for other purposes. A practice might create 2 locations where one has a physical address and the other simply says “telehealth.” This allows the practice to sort out the telehealth employees when
NOTE: The same user can be attached to multiple locations.
Create Content
It is highly recommended that you upload all of your existing content before doing anything else. Doing so will save you a lot of time. This content includes modules, readings, quizzes, and videos (depending on your package plan).
Readings
The Readings tool allows you to upload PDFs, write your own text, and link to other text-based learning materials hosted on the web in places like Google Drive and Notion.
To add a new reading, navigate to Content Management → Readings → New Reading. Add a title a URL if necessary, and upload a file by selecting “Choose File.” To publish the reading, toggle the Publish? switch to the right and select Create Reading.
Videos
If your subscription allows, users can upload their own videos to the platform. Additionally, Pyxis can be contracted to create custom videos for you. The platform supports both 360º and traditional 4k videos.
To add a new video, navigate to Content Management → Videos → New Video. Add a title, and upload a file. Toggle whether or not to view using 360º player, and then to publish, toggle the Publish? switch to the right and select Create Video.
Skill Assessments
Skill assessments can be used to observe and evaluate new employees as they practice or demonstrate essential skills in a more practical setting, ensuring they meet the required proficiency levels before working independently by marking them as pass or fail.
To create a new/edit an existing skills assessment, select “Skills” in the content management section. Here you can tailor the title and description to your needs and add a simple assessment “quiz”. This can be as simple as pass/fail or more involved depending on the skill how you’d want to assess the employee. Once created or updated, it will appear as assignable content to a user and can also be allocated into roles, tracks, and modules.
Once assigned to a user, it will appear in the For You section of the mobile app. Here the user, when they’re ready, can select Request Assessment and then choose their desired evaluator. Anyone other than a basic user has the ability to respond to an evaluation request. Once the user selects an evaluator and requests an assessment, an email notification will automatically be sent to the evaluator with a link to take them to the Skill Assessment.
When the skill has been demonstrated, the evaluator can mark the skill appropriately under the user’s profile. The status, pending evaluation requests, and the overall progress of a skill assessment can be viewed by clicking on the View Progress tab in the user’s profile.
Modules
Learning materials such as readings, videos, and quizzes can be collectively assembled into individual lessons designed to teach specific concepts.
To create a new module, navigate to Content Management → Modules → New Module. Add a title and then Add Content. Select the readings, videos, and quizzes you wish to group together in a module. To publish the quiz, toggle the Publish? switch to the right and select Create Module.
Modules can also be created by importing SCORM files. Select Import SCORM Module, Choose File, Upload File. This may take a few minutes, depending on the size of your .zip file. You are able to preview the content before publishing to ensure it is uploaded correctly.
NOTE: We highly recommend prioritizing the creation of modules as the use of modules can greatly improve content delivery efficiency.
Quizzes
Quizzes can be added to modules for a quick built-in assessment. Custom quizzes with multiple-choice questions can be created to test employees on their knowledge of learning materials. These quizzes can be set with a required passing score and the ability to fail or retake.
To create a new video, navigate to Content Management → Quizzes → New Quiz. Add a title and percentage needed to pass. To publish the quiz, toggle the Publish? switch to the right and select Create Quiz.
Users can add a Cool Off period to quizzes preventing quiz-takers from retaking a quiz immediately after failing it.
Content Gaps
By now, you should have a good understanding of what you have and what you are missing. If you are missing content, you will be able to create your own or use the AI Content Brain for content creation assistance. More information on this can be found later in the guide.
Create Tracks
Tracks can be viewed as information highways where the destination is the desired result. If you want someone to move up in position at your practice, you would place them on a track that supplies them with the needed materials and assessment.
Tracks allow you to pair modules and individual learning materials to create a group of greater information. For example, a “Vet Tech A to Tech B” track may be assigned to an employee who currently fills a Vet Tech A role but whom you wish to promote to a Vet Tech B role.
Tracks can also be used as a way to group together “new hire” training materials.
NOTE: We highly recommend creating “new hire” tracks for all of your roles so that anytime someone is hired, there is a package of training material waiting for them.
To create a new track, click Tracks on the main navigation bar and then New Track. Add the title of your new track, and then click Add Content to select modules, readings, and videos.
Create Roles
Next, you’ll create roles. Roles are often people’s job titles, but in some cases, they may just be additional roles a user has within your practice. .In the example below, there are roles created for DVMs, Front Desk Staff, Office Staff, Administrator, and Vet Technician. When creating roles, keep in mind that you will be able to assign modules, tracks, and specific content by role.
To create a new role, select New Role under Roles in the main navigation. Here you will be able to title your new role and attach tracks to the role so that users assigned this role will automatically be assigned the correct tracks.


Create Users
If you’ve created your account in the suggested order, you will be able to easily create users and assign them content at the same time.
Users are created for each organization employee who needs access to the Pyxis platform. User permissions are assigned based on the access needed. User permissions are Basic User, Lead, Manager, and Admin.
Basic User: Users can progress through assigned trainings at their own pace but are unable to reset, edit, or reschedule trainings and/or modules.
Lead: A lead could be the point person for training. They can reset trainings for a user and can also mark items complete in the Checklist section of a Basic Users account. (Plus all Basic User capabilities)
Manager: A manager can create new content and assign content to Basic Users. (Plus all Basic User & Lead capabilities)
Administrator: An administrator can create new accounts, assign and reassign accounts as needed, reset passwords, and manage the company's Pyxis subscription. (Plus all Basic User, Lead, Manager, & Administrator capabilities)
To create a new user, navigate to Users and select New User. Add email address, password, name, select permissions, select location, and then Create User.
AI Content Brain
The Content Brain is our AI tool designed to assist in the creation of new training content.
First, select your audience. The options are based on the roles you have previously set up. Next, enter the topic you want the content built around. It helps to include descriptive words in the topic and include the words "as a template" when you want the final result to be a template.
Click Generate to allow the Content Brain to complete its task. If you like the results, click Save & Edit to transfer the content to your readings section.
Please note that the Content Brain should be used as a tool to get the bulk of your content created, but most newly created readings will require you to edit and proof the content before releasing it to your employees. The Content Brain cannot be trusted to give accurate medical information.